Hosting a YUM repository on Amazon S3
January 9, 2016
Up until recently at StorReduce we had been building and
distributing our software as an RPM but we didn’t actually operate a YUM repository.
This meant that while we could give a customer a new RPM to install manually, they
couldn’t just run yum update to pull down the latest version of StorReduce.
We decided to start operating a YUM repository to make things easier, which meant finding a suitable place to host it, as well as updating our build processes to publish RPMs to it as part of our CI process, and to pull RPMs from it when we built our appliances.
To avoid operating our own web server we turned to Amazon S3 to host the repository. By leveraging S3’s ability to serve static content over HTTP(S) and a few simple lines of shell script we were able to come up with a scalable and secure solution that requires zero maintenance. In addition to this we created a simple way to support development and production repositories, with an easy way to “promote” a specific RPM from development to production, thereby exposing it to our end users for use. Additional stages could be added to the workflow (e.g. perhaps introducing a QA repo in between dev and prod, but that will be specific to the situation).
Below is a guide for reproducing this setup. I recommend running these scripts via an automated CI tool, which will give you visibility and auditability over what was pushed to production and when.
1. Create and configure the buckets
In the S3 web console create two buckets, one for development and one for production:
production-yum\
development-yum\
Next we need to ensure that the buckets are publicly accessable, so update each buckets bucket policy to enable read-only access for everyone, making sure to substitute in the correct bucket name:
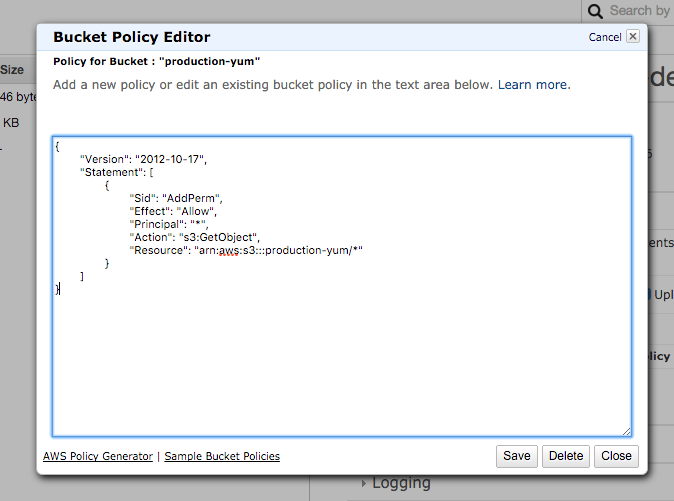
{
	"Version": "2012-10-17",
	"Statement": [
		{
			"Sid": "AddPerm",
			"Effect": "Allow",
			"Principal": "*",
			"Action": "s3:GetObject",
			"Resource": "arn:aws:s3:::production-yum/*"
		}
	]
}
2. Create your repo definition file (and optional GPG key)
Now we need to create the .repo file that can be imported in to end users
systems to allow them to install packages from our repo.
This is the time to create a GPG key if you haven’t already, I recommend following the instructions on the Fedora wiki, specifically the Creating GPG Keys Using the Command Line and Exporting a GPG Key Using the Command Line sections.
Once you have a GPG key upload it to the root of each bucket. You can skip using GPG keys if you’d like, although it isn’t recommended.
For each of the buckets created in step 1, create a repo-name.repo file in the
root of the bucket with the following contents, again making sure to substitute
in the name of your bucket/repo:
[production]
name=Production Packages  - $basearch
baseurl=https://production-yum.s3-us-west-2.amazonaws.com/$basearch/
enabled=1
gpgkey=https://production-yum.s3-us-west-2.amazonaws.com/my-gpg-key
gpgcheck=1
NOTE: If you’ve decided not to use GPG keys then delete the gpgkey line above
and set gpgcheck=0.
Your buckets should now look like this:
production-yum\
  - production.repo
  - my-gpg-key

development-yum\
  - development.repo
  - my-gpg-key
3. Publish your RPMs
In this step I’ll assume you are already producing RPMs via a tool like rpmbuild.
If you want to learn how to create RPMs then the Fedora Wiki has a detailed (if a
little dense) article here.
If you’ve opted to use GPG keys make sure you sign the RPMs when you build them.
Once you have built your RPM the next step is to publish it to the repo(s) hosted on S3. The basic idea is that you pull down the contents of the repo to your local machine, add the new RPM, then push the updated repo contents back to S3.
The trick is to use the aws s3 sync command to ensure only new/modified files
are moving back and forth when pulling/pushing to S3. To make this work you should
always use a consistent folder name for the work directory. I chose to use /tmp/$BUCKET_NAME
which means that for the uptime of our build server we will use a cached copy of
the repo, making RPM publishing nice and quick.
Here is the script that we use, it expects to be given a source directory that
contains the output of rpmbuild and a target bucket that contains the YUM
repo that it will publish the RPM to. It works regardless of if the repo has been
created before or not (by omitting the --update arg).
I recommend only using this script to publish to the development repo you created in step 1, we will use a different script in step 4. to move RPMs from this development repo to the production repo.
publish-rpm.sh:
./publish-rpm.sh -s /tmp/rpmbuild -t development-yum
#!/bin/bash
# Publishes built RPMs to an s3-backed RPM repo.
set -e
if [ ! -z "${DEBUG}" ]; then
  set -x
fi

SCRIPT_DIR=$( cd "$( dirname "${BASH_SOURCE[0]}" )" && pwd )
SRC_BASE="${SCRIPT_DIR}/../.."

DEPENDENCIES=("aws" "createrepo")
REGION="us-west-2"
SOURCE_DIR=""
TARGET_BUCKET=""

for dep in "${DEPENDENCIES[@]}"
do
  if [ ! $(which ${dep}) ]; then
      echo "${dep} must be available."
      exit 1
  fi
done

while getopts "s:t:" opt; do
  case $opt in
    s) SOURCE_DIR=$OPTARG ;;
    t) TARGET_BUCKET=$OPTARG ;;
    \?)
      echo "Invalid option: -$OPTARG" >&2
      exit 1
      ;;
  esac
done

if [ -z "${SOURCE_DIR}" ]; then
  echo "Source directory must be specified."
  exit 1
fi

if [ -z "${TARGET_BUCKET}" ]; then
  echo "Target bucket must be specified."
  exit 1
fi

TARGET_DIR="/tmp/${TARGET_BUCKET}"

# make sure we're operating on the latest data in the target bucket
mkdir -p $TARGET_DIR
aws --region "${REGION}" s3 sync "s3://${TARGET_BUCKET}" $TARGET_DIR

# copy the RPM in and update the repo
mkdir -pv $TARGET_DIR/x86_64/
cp -rv $SOURCE_DIR/RPMS/* $TARGET_DIR
UPDATE=""
if [ -e "$TARGET_DIR/x86_64/repodata/repomd.xml" ]; then
  UPDATE="--update "
fi
for a in $TARGET_DIR/x86_64 ; do createrepo -v $UPDATE --deltas $a/ ; done

# sync the repo state back to s3
aws --region "${REGION}" s3 sync $TARGET_DIR s3://$TARGET_BUCKET
4. Promote RPMs from development to production
Now that RPMs can be published to the development repo you have an opportunity to
test these builds internally. Once a release of a new version of your software
is tagged you will want to push the corresponding RPM to the production
repo so that your end users can access it via yum update.
Here is the script that we use to do that. It takes the name of the RPM, the name of the bucket to copy it from and the name of the bucket to copy it to.
This script is quite similar to the previous script, except that it knows to fetch the source RPM from the source bucket/repo instead of the local file system.
promote-rpm.sh:
./promote-rpm.sh -r my-rpm-1.0.1 -s development-yum -t production-yum
#!/bin/bash
# Promotes an RPM from one repo to another (e.g. dev -> prod)
set -e
if [ ! -z "${DEBUG}" ]; then
  set -x
fi

SCRIPT_DIR=$( cd "$( dirname "${BASH_SOURCE[0]}" )" && pwd )
SRC_BASE="${SCRIPT_DIR}/../.."

DEPENDENCIES=("aws" "createrepo")
REGION="us-west-2"

while getopts "s:t:r:" opt; do
  case $opt in
    r) RPM_MATCH=$OPTARG ;;
    s) SOURCE_BUCKET=$OPTARG ;;
    t) TARGET_BUCKET=$OPTARG ;;
    \?)
      echo "Invalid option: -$OPTARG" >&2
      exit 1
      ;;
  esac
done

for dep in "${DEPENDENCIES[@]}"
do
  if [ ! $(which ${dep}) ]; then
      echo "${dep} must be available."
      exit 1
  fi
done

if [ -z "${RPM_MATCH}" ]; then
  echo "RPM match string must be specified."
  exit 1
fi

if [ -z "${SOURCE_BUCKET}" ]; then
  echo "Source bucket must be specified."
  exit 1
fi

if [ -z "${TARGET_BUCKET}" ]; then
  echo "Target bucket must be specified."
  exit 1
fi

SOURCE_DIR="/tmp/${SOURCE_BUCKET}"
TARGET_DIR="/tmp/${TARGET_BUCKET}"

# make sure we're operating on the latest data in the source bucket
mkdir -p $SOURCE_DIR
aws --region "${REGION}" s3 sync "s3://${SOURCE_BUCKET}" $SOURCE_DIR

# make sure we're operating on the latest data in the target bucket
mkdir -p $TARGET_DIR
aws --region "${REGION}" s3 sync "s3://${TARGET_BUCKET}" $TARGET_DIR

# copy the RPM in and update the repo
mkdir -pv $TARGET_DIR/x86_64/
cp -rv $SOURCE_DIR/x86_64/$RPM_MATCH-1.x86_64.rpm $TARGET_DIR/x86_64/
UPDATE=""
if [ -e "${TARGET_DIR}/noarch/repodata/repomd.xml" ]; then
  UPDATE="--update "
fi
for a in $TARGET_DIR/x86_64 ; do createrepo -v $UPDATE --deltas $a/ ; done

# sync the repo state back to s3
aws --region "${REGION}" s3 sync $TARGET_DIR s3://$TARGET_BUCKET
5. Test the new repos
This step is nice and simple and is exactly what end users will need to do to install or update RPMs from the new repo.
Install the new repo on a client machine:
sudo wget https://production-yum.s3-us-west-2.amazonaws.com/production.repo -O /etc/yum.repos.d/production.repo
Then start installing or updating packages from the repo:
sudo yum install <my-package-name>
There you have it, a secure and scalable YUM repo hosted on S3 that requires no servers or maintenance.